Understanding Boat Identification and Legal Display Rules
Applying lettering to your vessel involves more than choosing an appealing typeface and color scheme. State and federal agencies enforce precise standards for how a vessel displays its official registration sequence. In the United States, recreation craft powered by mechanical propulsion must display registration identifiers on both sides of the bow. These identifiers allow law enforcement officers, harbor masters, and rescue teams to immediately recognize an operating vessel from a distance on open water.
A standard state registration sequence generally follows a designated format consisting of two state abbreviation letters, four numbers, and two trailing letters. These characters must be displayed in plain, vertical block font and measure at least three inches in height. Script fonts, italicized styling, or decorative flourishes are strictly prohibited for official registration markings because they compromise readability when viewed through binoculars or across choppy water.
In addition to letter height and shape, maritime regulations require high visual contrast between your vinyl boat lettering and the underlying hull surface. Dark hulls require bright white or yellow characters, while white gelcoat demands dark marine vinyl like navy blue or black. Placing an outline or drop shadow around the letters does not satisfy the contrast requirement on its own; the solid body of each character must stand out distinctly against the hull background.
Vessels documented with the United States Coast Guard follow a different protocol entirely. Documented recreational vessels do not display state registration numbers on the bow, but they must feature their officially documented vessel name and hailing port on an exterior structural part of the hull. Understanding whether your vessel is state-titled or federally documented determines exactly which letters for boats you need to order before heading out on the water.
State Registration Sequences and California CF Number Rules
Every state administers vessel registration through fish and wildlife agencies, departments of natural resources, or motor vehicle divisions. While the broad framework adheres to national Coast Guard standards, local enforcement details can vary slightly regarding spacing and validation sticker placement. In general, registration sequences must read from left to right on both the port and starboard sides of the forward half of the hull.
Boaters navigating the Pacific coast or inland waterways often deal with specific state conventions, such as CF numbers mandated across coastal harbors and reservoirs. If you keep a boat docked among the hundreds of marinas in California, your CF sequence must be applied forward of the midsection on both sides, arranged with hyphens or distinct block spaces matching the width of an average letter between the prefix, numeric digits, and suffix.
Spacing errors represent one of the most common reasons marine patrol officers issue corrective warnings during routine safety inspections. For example, a sequence like CF 1234 AB must maintain an unbroken visual gap equivalent to the width of the letter 'C' between the letters and numbers. Squeezing the sequence together into an unbroken string makes the characters difficult to log quickly during emergency operations or routine harbor monitoring.
Your annual or multi-year validation decal must also be positioned according to state guidelines, typically placed within three to six inches forward or aft of the registration numbers on the same horizontal plane. When planning your layout, measure the available flat surface on your bow carefully. Avoid placing vinyl decals over sharp strakes, rub rails, or bow flare curves where the adhesive may lift under hydraulic pressure when cutting through wakes.
Choosing Marine-Grade Materials for Vinyl Decals
Marine vinyl must endure brutal environmental stressors that would destroy ordinary automotive or craft stickers within months. Constant exposure to intense solar ultraviolet radiation, salty sea spray, rapid temperature fluctuations, and periodic submersion requires specialized vinyl boat decals manufactured specifically for marine applications. Selecting the wrong grade often leads to early shrinking, edge curling, cracking, and gelcoat staining.
The sign industry divides adhesive films into two major categories: cast vinyl and calendared vinyl. Premium cast vinyl starts as a liquid mixture poured onto a moving casting sheet, resulting in a thin, dimensionally stable film typically measuring two mils thick. Cast films exhibit almost zero shrinkage over time, conform smoothly over compound hull curves, and typically last between seven and ten years in full outdoor marine exposure.
Calendared vinyl, by contrast, is manufactured by rolling heated PVC resin through heavy steel rollers into a thicker film around three to four mils. While calendared films cost less upfront, they retain internal mechanical memory and gradually pull back toward their original shape under hot sunlight. This shrinkage leaves a ring of sticky adhesive residue along the edges of your custom boat stickers, which quickly collects airborne dust and marine exhaust grime.
Adhesive formulations matter just as much as the face film. Premium vinyl boat decals feature permanent acrylic solvent adhesives engineered to cure tightly against smooth gelcoat, painted aluminum, or two-part polyurethane topside finishes. Water-based adhesives found in promotional stickers break down rapidly when submerged or washed with marine soaps, causing edges to peel after just a few weekend outings.
Designing Custom Boat Names and Transom Graphics
Choosing and displaying a boat name is a time-honored maritime tradition that gives a vessel its unique character. Unlike the strict block-letter rules governing bow registration markings, boat name decals on the transom or hull sides allow for significant artistic freedom. Owners can select elegant cursive scripts, bold nautical typography, modern minimalist fonts, and custom color palettes that complement the overall aesthetic of the vessel.
When laying out boat name stickers for the transom, proportion is critical. A small name centered on an expansive flat stern looks disconnected, while oversized lettering that crowds the swim platform or edge trim looks cramped. As a general rule of thumb, the name should occupy roughly two-thirds of the usable horizontal width of the transom, leaving comfortable breathing room between rub rails, outboard motor brackets, swim ladders, and tow eyes.
If you regularly cruise between harbors or rent transient slips at visiting destinations, your hailing port should accompany your boat name. The hailing port traditionally includes your city and state abbreviation, arranged horizontally below the vessel name in a smaller, clean typeface. Standard practice suggests sizing the hailing port letters between one-third and one-half the height of the primary vessel name for proper visual hierarchy.
Multicolor graphics and layered designs provide additional depth and visual distinction. Many personalized boat decals incorporate drop shadows, contrasting outlines, or subtle metallic accents in chrome or brushed gold. When designing layered vinyl, ensure the base layers are applied using high-performance cast films so the overlapping vinyl edges bond seamlessly without trapping tiny air channels between the film sheets.
Tailoring Lettering for Sailboats and Specialty Hulls
Sailboats present unique layout challenges that differ markedly from powerboats. Modern sailboat transoms often feature fold-down swim platforms, walk-through helm access, self-steering windvanes, and emergency boarding ladders that eliminate wide, flat vertical surfaces. As a result, sailboat name decals are frequently installed along the aft quarter sides of the hull or on the cabin trunk sides where visibility remains unobstructed.
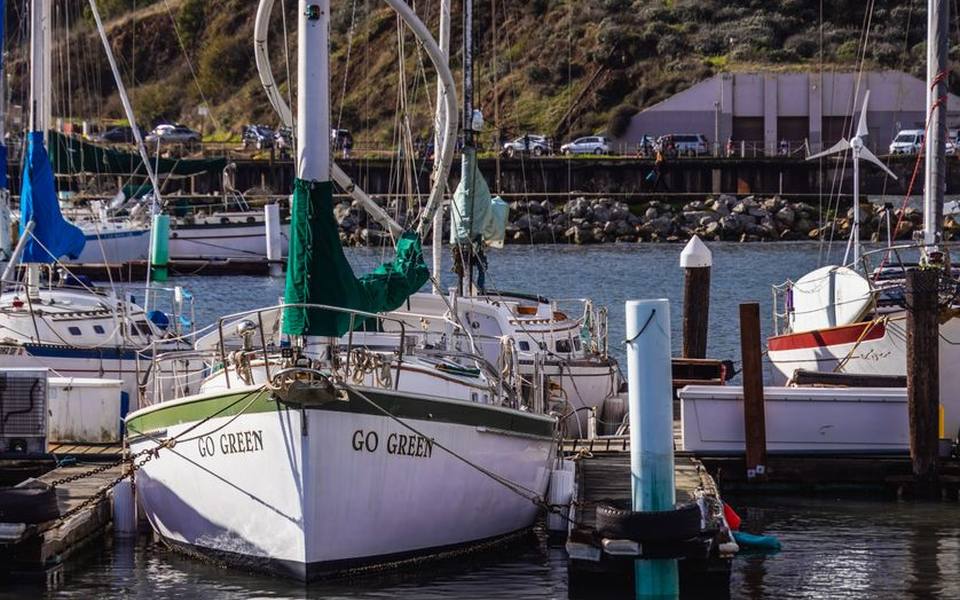
Applying vinyl boat lettering along the quarter hull requires calculating the curvature of the hull sheer line. If you install lettering parallel to an artificial horizontal water line, the text may appear crooked relative to the sweeping curve of the deck and toe rail. Aligning your graphics subtly with the natural sheer of the hull produces a cohesive, professional appearance when the sailboat sits quietly at the dock or heels over under sail.
Catamarans, center consoles, and aluminum freshwater vessels also require specific graphic treatments. Dual-hull catamarans often display boat decals lettering on the outboard quarters or across the aft bridge deck bulkhead. Center consoles frequently carry custom boat decals along the mid-hull sides, where wide flared bows taper down into flat running surfaces that provide clean, uninterrupted sightlines for onlookers.
Rigid inflatable boats and unpainted aluminum skiffs present unique adhesion hurdles. Standard vinyl boat decals will not adhere reliably to porous Hypalon, PVC tubes, or unprimed, heavily oxidized aluminum plates. For metal workboats, surface preparation requires special etching and degreasing, while inflatable crafts typically require specialized flexible stencils and elastomeric marine inks instead of standard vinyl film.
Preparing Gelcoat and Metal Surfaces for Decal Application
Flawless graphic application begins long before you peel the backing paper from your vinyl decal. Roughly ninety percent of all vinyl adhesion failures trace back to contaminated or improperly prepared hull surfaces. Gelcoat naturally absorbs microscopic fuel oils, airborne pollution, road grime from trailering, and protective wax layers that actively prevent adhesives from establishing a permanent chemical bond.
Begin the preparation process by washing the entire application zone with water and an effective biodegradable marine soap to lift loose grit and mineral scale. Rinse thoroughly with clean freshwater and let the hull dry completely. Washing the hull prevents surface sand and dirt from acting like abrasive sandpaper during the subsequent degreasing and solvent wipe steps.
Next, completely remove any remaining wax, ceramic coatings, or polymer sealants. Rubbing alcohol or dedicated marine wax-and-silicone removers work exceptionally well for this stage. Soak a lint-free microfiber rag in solvent, wipe firmly across the intended graphic area in a single direction, and immediately dry the surface with a second clean cloth before the solvent evaporates and redeposits dissolved wax back onto the gelcoat.
Pay close attention to ambient environmental conditions on installation day. Marine vinyl adhesives adhere best when both hull temperatures and ambient air fall between sixty and eighty degrees Fahrenheit. Applying decals in direct, blazing sun on a humid afternoon in Florida can cause the vinyl to stretch excessively and the adhesive to grab prematurely, while cold temperatures make the vinyl brittle and prevent adhesive bonding.
Step-by-Step Vinyl Installation Using Proven Application Methods
Professional installers rely on two primary installation techniques: the dry hinge method and the wet application method. The dry hinge method is universally recommended for official registration numbers and small-to-medium boat name decals. It relies on standard blue painter's tape to establish an anchor point, ensuring your letters remain perfectly level while you work through the transfer steps.
To execute the hinge method, tape your intact graphic sheet to the hull using a long strip of masking tape along the top or center edge. Step back several paces to verify alignment from different angles. Once satisfied, fold the graphic upward along the tape hinge, peel away the thick paper backing to expose the sticky vinyl, and hold the transfer tape taut slightly off the hull surface.
Using a firm plastic squeegee wrapped in a soft microfiber felt sleeve, stroke downward from the center outward toward the edges using smooth, overlapping strokes. Work systematically down the graphic to push air forward and prevent bubbles from becoming trapped underneath. After squeegeeing the entire surface firmly, peel the translucent transfer tape back against itself at a sharp 180-degree angle, leaving the crisp vinyl characters bonded to the hull.
The wet method is occasionally used for large, solid custom boat decals or complex hull wraps to prevent premature adhesion. By lightly misting the hull with a mild solution of water and a few drops of baby shampoo, you can slide the graphic into place before squeegeeing the liquid out from underneath. However, the wet method requires extensive drying time before transfer tape removal and should never be used on porous or unsealed wood surfaces.
Adding Accent Graphics, Striping, and Hull Wraps
Beyond required registration text and transom names, personalized boat decals give boaters endless opportunities to customize their vessels. Hull striping, boot stripes, fish graphics, tournament team emblems, and registration stickers blend functional design with personal expression. Coordinated color accents can transform an aged, weathered hull into an eye-catching craft that turns heads around every marina dock.
Replacing damaged or faded waterline boot stripes is one of the most effective aesthetic upgrades an owner can perform. Marine striping tapes are available in single, double, and triple-band configurations protected by an integrated top carrier film. When laying down long stripes along the waterline, avoid stretching the vinyl tape by hand; excessive tension pulls the vinyl thin and causes it to pull loose and shrink over time.
Larger custom boat stickers and wrap segments require careful planning around hardware and compound curves. Bow flares and stepped hull bottoms force two-dimensional vinyl sheets to stretch across three-dimensional contours. When wrapping around strakes or sharp chines, use a controlled heat gun on a low setting to soften cast vinyl just enough to press it into recessed channels without distorting the underlying print.
Before trailering your freshly lettered craft down to local boat launches, allow newly applied vinyl graphics to cure undisturbed for at least forty-eight hours. The adhesive system needs time to reach full structural bonding strength before facing turbulent hydrodynamic water drag, wave impacts, and high-speed trailering wind.
Removing Outdated Graphics and Addressing Gelcoat Ghosting
Upgrading an older boat or re-registering a pre-owned vessel often begins with removing aged, brittle boat letters decals left behind by a previous owner. Attempting to chip away dry vinyl using metal razor blades or scrapers will inevitably gouge gelcoat, cut through painted surfaces, and create expensive cosmetic damage that requires professional fiberglass repair.
The safest approach involves softening the old vinyl film using controlled heat. A variable-temperature heat gun or standard household hair dryer held several inches away softens the face film and loosens the adhesive beneath. Warm an individual character for five to ten seconds, gently lift a corner using your fingernail or a plastic razor blade, and steadily peel the vinyl off at a forty-five-degree angle.
After peeling away the vinyl face film, a stubborn layer of hardened acrylic adhesive usually remains bonded to the hull. Saturate the residue with citrus-based adhesive removers, mineral spirits, or denatured alcohol. Allow the chemical solvent to penetrate the adhesive for two to three minutes, then roll the softened glue away using a clean rag or non-marring plastic scraper until the surface feels completely smooth.
Older vessels frequently suffer from 'ghosting'—a noticeable visual shadow where the original name was applied. Because surrounding gelcoat fades and oxidizes under sun exposure while the covered area remains shielded, a silhouette remains visible even after all adhesive is gone. Restoring the surface requires compounding the surrounding gelcoat with marine polishing compounds and a rotary buffer to even out the gloss levels.
Long-Term Care, Maintenance, and Edge Protection
High-performance vinyl boat lettering requires routine maintenance to maintain its vibrant color and sharp edge definition throughout years of active cruising. Harsh chemical cleansers, aggressive scrub brushes, and abrasive compounding pastes will dull glossy vinyl laminate and lift fine letter serifs. Treat your vinyl graphics with the same care you afford delicate electronics or clear helm enclosures.
When washing down your boat at the slip, use a soft wash mitt and mild pH-neutral boat wash. Avoid aiming high-pressure power washer nozzles directly at decal edges, as concentrated water jets can shear under the vinyl boundary and strip characters instantly from the hull. Maintain at least eighteen inches of distance between spray nozzles and all graphics, keeping water spray directed at a perpendicular angle.
Waxing and sealing over your vinyl helps shield the film from intense ultraviolet rays and airborne soot. Apply a quality synthetic marine polymer sealant or carnauba wax over both the hull and the decals. When applying wax over small letters, work gently around fine letter tips to prevent white wax residue from caking along graphic margins, which can prove difficult to scrub away later.
During winter lay-up or extended dry storage, protective boat covers should be securely tied down to prevent flapping canvas straps from rubbing across custom graphics. Continuous chafing from loose canvas or dock fender ropes will wear through vinyl protective laminates over a single season. Investing a few minutes in proper setup ensures your boat lettering looks sharp and performs dependably for years.
Published 2026-09-21 · reviewed with each rebuild, last September 2026.
Find marinas near you
The directory lists 7,143 marinas by state and city — pick your state or use the “Near me” button in the header.
More guides
-
 Safety
Boat Fire Extinguisher Inspection: Schedule, Checklist, and Costs
-
 Money
MoneyBoat Club Membership Costs: Initiation Fees, Monthly Dues, and Ownership Comparison
-
 Storage
Boat Winterization and Storage: Costs, Checklist, and Shrink Wrapping Guide
-
 Storage
Boat Slips and Docking Fees: How Much Does It Cost to Keep a Boat in the Water?
-
 Owning
Essential Nautical Terms and Practical Boating Knowledge: From the Helm to Harbor Life
-
 Owning
A Practical Guide to Boat Mooring: Buoys, Lines, and Technique
-
 Safety
Essential Boat Safety Gear, Marine Electronics, and Equipment Guide
-
 Service
Outboard Engine Service and Rebuild Costs: What Boat Owners Should Expect to Pay
-
 Safety
Marine Weather Forecasts and Warnings: Reading NOAA Reports and Coastal Maps
-
 Safety
Boating Safety Certification and Licensing: State Requirements and Exam Prep
-
 Service
Saltwater and Freshwater Fishing Charters: Choosing Inshore, Offshore, and Deep Sea Trips
-
 Owning
Bareboat Yacht Charters: How to Rent, Qualifications, and Cruising Preparation
-
 Buying
Pontoon & Tritoon Boats: Buying, Renting, Models, and Pricing Guide
-
 Owning
Holiday Boat Parades and Coastal Festivals: Viewing Guide and Schedules
-
 Buying
A Complete Guide to Buying Used Boats: Valuations, Inspections, and Registration
-
 Owning
Waterfront Dining and Dockside Restaurants: Boater's Guide to Dock and Dine
-
 Owning
Dockside Bait Systems, Live Bait Sourcing, and Fish Cleaning Station Setup
-
 Safety
Marine Fire Safety Inspection and Extinguisher Maintenance
-
 Storage
Complete Guide to Boat Winterization, Shrink Wrapping, and Storage Covers
-
 Buying
Electric Boat Motors and Trolling Systems: The Practical Conversion Guide
-
 Owning
A Practical Guide to Public Boat Launches, Kayak Ramps, and Water Access
-
 Owning
Marine Lithium Batteries vs AGM: Setup, Charging, and Performance
-
Service
Boat Fiberglass & Gelcoat Repair Guide: Fixing Cracks, Blisters & Scratches
-
Service
Marine Fuel Tank Cleaning and Rust Removal Guide
-
Safety
USCG Captain's License Guide: OUPV 6-Pack Requirements and Renewal
-
Buying
Boat Dinghies and Inflatables Guide: Types, Motors, and Selection
-
Service
Boat Towing Services and Marine Assistance Memberships Explained
-
Service
Outboard Motor and Lower Unit Maintenance, Repair, and Marine Diesel Guide
-
Buying
Shallow Water Anchor Systems: Power-Pole vs. Minn Kota Talon & Raptor
-
 Service
Complete Guide to Marine Bottom Paint and Antifouling Application
-
Owning
Cruising America's Great Loop: Route Planning, Boat Choice, and Cruising Resources
-
Service
Boat and Fishing Charters: Complete Guide to Styles, Rates, and Booking
-
Buying
Personal Watercraft and Jet Ski Guide: Models, Rentals, and Buying
-
 Owning
Marine Supply Stores and Chandleries: Outfitting Your Boat
-
Safety
Marine Weather Forecasts and NOAA Wave Reports: A Practical Boater's Guide
-
Safety
USCG Boat Registration, Boater Education, and Navigational Safety Rules
-
Owning
Marine Lithium Batteries, Solar Panel Systems, and Trickle Charging Guide
-
Service
Boat Trailer Maintenance: Bearings, Replacement Kits, and Towing Prep
-
Safety
Marine VHF Radio Frequencies, Channels, and Electronics Setup
-
 Service
Complete Boat Hull Maintenance Guide: Washing, Acid Cleaners, Gelcoat Repair, and Antifouling Paint
-
Service
Fixing Inflatable Boat Leaks and Replacing Worn Bimini Top Canvas
-
Owning
Buoy Mooring Setup, Dock Lines, Cleat Hitch Knots, and Anchor Pins
-
 Owning
Boat Trim Tabs Guide: Lenco, Zipwake, Bennett, and Electric vs Hydraulic
-
Owning
Upgrading Boat Swim Platforms, Boarding Ladders, and Marine Vinyl Seating
-
Owning
Best Gifts for Boaters, Practical Marine Accessories, and Kayak Storage Racks