Why Trailer Wheel Bearings Fail and When to Service Them
Boat trailer wheel bearings operate in far more punishing conditions than those on standard utility trailers or passenger vehicles. Every time you launch a boat, warm hubs submerge into cold water, which causes the air inside the hub assembly to rapidly contract. This thermal contraction creates a vacuum that pulls surrounding water past rubber seals and directly into the bearing races. When moisture mingles with bearing grease, corrosion begins, lubrication breaks down, and friction increases dramatically during highway travel.
Routine maintenance intervals typically dictate that trailer wheel bearings should be inspected and repacked at least once every season or roughly every two to three thousand miles. For owners who launch frequently in saltwater environments, service intervals are generally shorter, as salt crystals accelerate metal pitting and chemical breakdown of grease. Waiting until a bearing begins squealing or grinding on the highway usually leads to spindle damage, lost wheels, or an unexpected roadside breakdown far from home.
Detecting early signs of bearing wear requires minimal equipment and only a few minutes before each trip. Jack up the trailer axle until the tire clears the pavement, grasp the top and bottom of the tire, and rock it back and forth to check for noticeable play or looseness. Spin the wheel by hand while listening closely for rumbling, rasping, or gritty sensations, which indicate that the tapered rollers or races have suffered moisture intrusion or surface wear.
Understanding the Hub Assembly and Essential Parts
Before disassembling your trailer axle, familiarizing yourself with a standard boat trailer parts diagram makes the maintenance process straightforward. The hub assembly revolves around the stationary axle spindle, which features machined surfaces polished to exact tolerances. Working from the inside out, the assembly consists of an inner grease seal, an inner tapered bearing riding inside a pressed steel race, the cast iron hub housing with wheel studs, an outer bearing and race, a flat spindle washer, a slotted castle nut locked by a cotter pin, and a protective outer dust cap.
The inner bearing is generally larger than the outer bearing because it carries a greater share of the vertical load transferred from the trailer frame through the axle spindle. Both bearings rely on matching conical races pressed firmly into the hub bore, allowing the angled rollers to support both radial vehicle weight and axial cornering thrust. If you replace worn bearings, you must always press out and replace the corresponding bearing races at the same time to prevent immediate uneven wear.
The rear grease seal acts as the primary barrier preventing water intrusion while keeping lubricating grease contained around the inner roller assembly. High-quality marine hubs utilize double-lip spring-loaded seals designed to maintain positive contact against the spindle shoulder even when exposed to water pressure during ramp dunking. Inspecting the spindle shoulder for grooving or rust is essential, as a scored metal surface will quickly tear a new seal lip and permit water to bypass the barrier.
Selecting the Right Replacement Kit and Marine Grease
When purchasing replacement hardware, choosing a complete trailer wheel bearings kit ensures all matched components work seamlessly together. A reputable kit typically includes inner and outer tapered roller bearings, their corresponding pressed-in races, a double-lip marine grease seal, a fresh cotter pin, and occasionally a new dust cap. Bearing sizes are stamped with industry-standard numbers on the bearing cones and races, but measuring the spindle diameters at both bearing journals with a digital caliper provides foolproof confirmation before ordering parts.
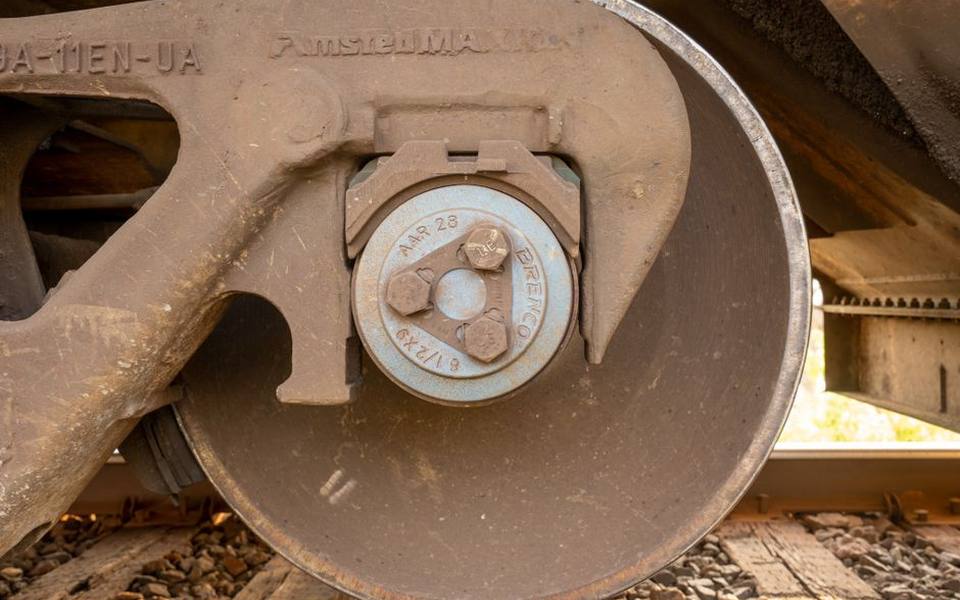
Selecting the correct trailer wheel bearings grease is just as critical as choosing durable steel components. Marine applications require heavy-duty water-resistant grease, typically formulated with an aluminum complex or calcium sulfonate thickener that resists water washout and salt emulsification. Standard automotive chassis greases generally rely on lithium bases that break down quickly when submerged, turning into a milky slurry that fails to lubricate high-speed roller bearings on the interstate.
Compatibility between grease formulas must also be observed when maintaining existing hubs without full disassembly. Mixing two incompatible grease bases, such as a lithium-complex grease with an aluminum-complex formula, can cause the thickening agents to separate and liquefy, completely purging the lubricant from the hub. If you are unsure what product was previously installed, thoroughly clean all old lubricant from the hub cavity and spindle using solvent before introducing fresh marine grease.
Removing the Hub and Inspecting Internal Components
To begin the disassembly process to replace boat trailer bearings, park the trailer on a level concrete surface, chock the opposite wheel firmly, and loosen the wheel lug nuts slightly before lifting. Position a heavy-duty hydraulic floor jack beneath the trailer frame or spring pad rather than directly under the center of the axle tube to prevent bending the metal. Once raised, secure the trailer on a rated jack stand, finish removing the lug nuts, and pull the wheel clear of the workspace.
Use a rubber mallet or flat chisel to gently pry the dust cap or spring-loaded bearing protector off the outer hub face, catching any displaced grease in a shop rag. Straighten the bent prongs of the cotter pin using needle-nose pliers, extract the pin, and unthread the slotted castle nut along with the heavy flat spindle washer behind it. Gently grasp the hub and slide it forward slightly; the outer bearing will slip forward on the spindle, allowing you to lift it off without dropping it into the dirt.
Slide the hub completely off the axle spindle and place it on a clean work surface lined with cardboard. Use a brass drift punch inserted through the front of the hub to tap the inner grease seal and inner bearing out through the rear opening. Thoroughly wipe the bare spindle with mineral spirits to inspect the journal surfaces; any deep ridges, rust pitting, or blue heat discoloration indicates severe wear that may require replacing the entire axle assembly.
Packing Bearings and Reassembling the Hub Assembly
Packing fresh grease into the roller bearings requires deliberate technique to ensure no dry air pockets remain inside the roller cage. Place a generous scoop of marine grease into the palm of your hand, then firmly press the wide base of the tapered bearing against the grease repeatedly until lubricant oozes upward through the small top gap between the rollers and cage. Rotate the bearing gradually until grease has penetrated every pocket around the entire circumference, or use a mechanical bearing packing tool to speed up the process.
If you are installing a new kit, drive the fresh bearing races into the hub using a dedicated bearing race driver or a smooth brass drift, tapping evenly around the rim until each race seats firmly against its internal shoulder. Pack the hub cavity between the races with grease, drop the packed inner bearing into place, and position the new marine seal over the rear opening. Tap the seal evenly using a flat wooden block until it sits completely flush with the hub casting edge.
Slide the assembled hub carefully onto the clean spindle, taking care not to nick the rubber seal on the threaded spindle tip. Insert the packed outer bearing, reinstall the spindle washer, and thread the castle nut down snug while rotating the hub by hand to seat the rollers. Back the castle nut off roughly one-sixth of a turn until the wheel spins freely with minimal end play, align the slot with the spindle hole, insert a new stainless cotter pin, and tap the dust cap firmly into place.
Pre-Trip Trailering Inspections and Highway Towing Prep
Preparing for a highway boat haul requires a methodical inspection sequence before your vehicle ever pulls out of the driveway. Begin by checking cold tire pressures on both the tow vehicle and the trailer against the inflation specifications printed on the trailer tire sidewall. Underinflated trailer tires flex excessively at highway speeds, building internal heat that causes sudden tread separation, while properly inflated tires promote even wear and stable trailing characteristics across varied road surfaces.
Hitch connections demand careful mechanical verification to ensure the ball coupler is fully locked and pinned before travel. Cross the safety chains underneath the trailer tongue in an X-pattern so they form a protective cradle capable of catching the tongue should the coupler release. Inspect the emergency breakaway cable, plug in the electrical harness, and confirm that turn signals, running lights, and brake lights illuminate clearly. If you are towing toward destinations with transient slips for an extended getaway, verifying these systems avoids unexpected delays on unfamiliar turnpikes.
During your journey, schedule a brief walk-around inspection at your first highway fuel stop roughly twenty miles down the road. Place your hand carefully against each trailer wheel hub or scan them with an infrared thermometer; both hubs should feel slightly warm to the touch, but never uncomfortably hot. An excessively hot hub indicates overtightened bearings, inadequate grease volume, or a dragging brake shoe that demands immediate attention before continuing toward the ramp.
Securing the Vessel and Managing Load Distribution
Safely hauling boat equipment over long distances depends heavily on proper weight distribution and robust physical tie-downs. The trailer tongue weight should typically represent approximately ten to fifteen percent of the total combined weight of the boat, trailer, and onboard equipment. Insufficient tongue weight causes terrifying high-speed trailer sway, while excessive tongue weight overloads the tow vehicle rear suspension and compromises steering traction, requiring you to adjust the boat position on the trailer bunks accordingly.
Securing the hull requires more than relying exclusively on the front bow winch strap and its safety chain. Install heavy-duty ratcheting transom straps that anchor the rear corners of the boat directly to the trailer frame, preventing the stern from bouncing or shifting during sudden swerves. If your boat features an outboard motor or sterndrive, install a dedicated transom saver or engine support bracket to relieve bending stress on the boat transom caused by the heavy engine cantilevered over road bumps.
Stow all loose equipment inside the boat before setting out, placing heavy coolers, tackle boxes, and gear low and centered over the trailer axles. Remove or firmly secure bimini tops, snap-on mooring covers, and cockpit cushions that could tear or blow away in highway slipstreams. Verifying that the bilge is dry and the hull drain plug is removed during transit keeps rain from pooling inside, ensuring you arrive smoothly at facilities with convenient boat launch access.
Trailer Registration, Road Compliance, and Safety Rules
Maintaining legal compliance on public roads requires keeping your boat trailer rego documents up to date and mounted correctly on the rig. In most states, utility and boat trailers must carry an individual license plate, annual registration sticker, and visible vehicle identification number stamped onto the tongue or frame rail. Some jurisdictions determine registration fees based on empty trailer weight, while others register trailers according to gross vehicle weight ratings, making local department of motor vehicles guidelines essential reading.
Braking regulations also vary significantly depending on total towed weight, with many states requiring independent trailer brakes on rigs weighing over three thousand pounds. Depending on your setup, trailers utilize hydraulic surge brakes that actuate via trailer momentum against the hitch ball, or modern electric-over-hydraulic systems controlled from inside the truck cab. Inspect brake fluid levels inside the tongue master cylinder regularly and verify that rubber brake hoses show no cracking, swelling, or leaks.
Operating across state borders introduces varying requirements regarding trailer lighting, wide-load permits, and safety equipment. Boaters planning coastal excursions to explore popular waterways and full-service marinas across Florida should note that regional enforcement often targets non-working submersible lights and missing safety chains. Keeping your trailer registration card and proof of insurance in the tow vehicle glove box ensures smooth interactions during routine traffic stops or safety checkpoints.
Launch Ramp Staging and Proper Trailer Parking
Executing a calm, efficient launch begins well before your tow vehicle reaches the water edge. Always pull into the designated staging lane to prepare your boat rather than blocking the active ramp lanes while loading supplies. Remove transom tie-down straps, unplug the trailer light wiring harness if your fixtures are not fully submersible LEDs, install the hull drain plug firmly, attach dock lines, and disconnect the motor support bracket while on flat, dry pavement.
Once prepared, back slowly and steadily down toward a boat launch ramp, keeping your vehicle aligned using side mirrors and gentle steering inputs. Submerge the trailer only far enough to float the stern while keeping the tow vehicle driven wheels on dry, high-traction concrete whenever possible. Having a helper hold the bow line allows the boat to slide free smoothly, after which you should immediately pull your vehicle forward to clear the lane for waiting boaters.
After clearing the ramp, navigating boat trailer parking requires observing marina signage and selecting stalls designed specifically for extended combination vehicles. Park straight within the painted lines so the trailer tongue does not intrude into travel lanes, and avoid occupying vehicle-only spaces that cause friction with other facility patrons. Engaging the vehicle parking brake and placing a wheel chock behind a trailer tire provides extra security, particularly when parking on inclined waterfront staging areas.
Seasonal Storage and Long-Term Bearing Care
Preparing a boat trailer for months of inactivity requires proactive care to keep moisture from ruining precision hub surfaces. When trailers sit motionless throughout winter or extended dry spells, internal condensation pools at the lowest point of the bearing race, causing localized rust spots known as brinelling. Jacking the trailer up and placing the frame on sturdy jack stands takes tire flat-spotting pressure off the rubber while allowing you to rotate the wheels periodically during storage.
Before laying the trailer up for the off-season, remove the dust caps to inspect the condition and color of the grease. If the grease appears milky, frothy, or dark brown, water has breached the seals during your final trips of the season and will corrode the metal over the winter months. Performing a full cleaning, inspection, and repack before winter storage ensures that fresh grease coats all polished surfaces, protecting them against oxidation through damp weather.
In spring, complete a thorough recommissioning pass before your maiden voyage to the water. Spin each tire by hand, listen for rough bearing drag, verify lug nut torque to manufacturer specifications, and inspect tires for sidewall cracking or dry rot. Give spring-loaded bearing protectors a gentle top-off using a hand grease gun, taking care never to overfill or blow out the rear rubber grease seal, ensuring your trailer remains completely dependable all summer long.
Published 2026-09-21 · reviewed with each rebuild, last September 2026.
Find marinas near you
The directory lists 7,143 marinas by state and city — pick your state or use the “Near me” button in the header.
More guides
-
 Safety
Boat Fire Extinguisher Inspection: Schedule, Checklist, and Costs
-
 Money
MoneyBoat Club Membership Costs: Initiation Fees, Monthly Dues, and Ownership Comparison
-
 Storage
Boat Winterization and Storage: Costs, Checklist, and Shrink Wrapping Guide
-
 Storage
Boat Slips and Docking Fees: How Much Does It Cost to Keep a Boat in the Water?
-
 Owning
Essential Nautical Terms and Practical Boating Knowledge: From the Helm to Harbor Life
-
 Owning
A Practical Guide to Boat Mooring: Buoys, Lines, and Technique
-
 Safety
Essential Boat Safety Gear, Marine Electronics, and Equipment Guide
-
 Service
Outboard Engine Service and Rebuild Costs: What Boat Owners Should Expect to Pay
-
 Safety
Marine Weather Forecasts and Warnings: Reading NOAA Reports and Coastal Maps
-
 Safety
Boating Safety Certification and Licensing: State Requirements and Exam Prep
-
 Service
Saltwater and Freshwater Fishing Charters: Choosing Inshore, Offshore, and Deep Sea Trips
-
 Owning
Bareboat Yacht Charters: How to Rent, Qualifications, and Cruising Preparation
-
 Buying
Pontoon & Tritoon Boats: Buying, Renting, Models, and Pricing Guide
-
 Owning
Holiday Boat Parades and Coastal Festivals: Viewing Guide and Schedules
-
 Buying
A Complete Guide to Buying Used Boats: Valuations, Inspections, and Registration
-
 Owning
Waterfront Dining and Dockside Restaurants: Boater's Guide to Dock and Dine
-
 Owning
Dockside Bait Systems, Live Bait Sourcing, and Fish Cleaning Station Setup
-
 Safety
Marine Fire Safety Inspection and Extinguisher Maintenance
-
 Storage
Complete Guide to Boat Winterization, Shrink Wrapping, and Storage Covers
-
 Buying
Electric Boat Motors and Trolling Systems: The Practical Conversion Guide
-
 Owning
A Practical Guide to Public Boat Launches, Kayak Ramps, and Water Access
-
 Owning
Marine Lithium Batteries vs AGM: Setup, Charging, and Performance
-
Service
Boat Fiberglass & Gelcoat Repair Guide: Fixing Cracks, Blisters & Scratches
-
Service
Marine Fuel Tank Cleaning and Rust Removal Guide
-
Safety
USCG Captain's License Guide: OUPV 6-Pack Requirements and Renewal
-
Buying
Boat Dinghies and Inflatables Guide: Types, Motors, and Selection
-
Service
Boat Towing Services and Marine Assistance Memberships Explained
-
Owning
Boat Lettering, Registration Numbers, and Custom Vinyl Decals
-
Service
Outboard Motor and Lower Unit Maintenance, Repair, and Marine Diesel Guide
-
Buying
Shallow Water Anchor Systems: Power-Pole vs. Minn Kota Talon & Raptor
-
 Service
Complete Guide to Marine Bottom Paint and Antifouling Application
-
Owning
Cruising America's Great Loop: Route Planning, Boat Choice, and Cruising Resources
-
Service
Boat and Fishing Charters: Complete Guide to Styles, Rates, and Booking
-
Buying
Personal Watercraft and Jet Ski Guide: Models, Rentals, and Buying
-
 Owning
Marine Supply Stores and Chandleries: Outfitting Your Boat
-
Safety
Marine Weather Forecasts and NOAA Wave Reports: A Practical Boater's Guide
-
Safety
USCG Boat Registration, Boater Education, and Navigational Safety Rules
-
Owning
Marine Lithium Batteries, Solar Panel Systems, and Trickle Charging Guide
-
Safety
Marine VHF Radio Frequencies, Channels, and Electronics Setup
-
 Service
Complete Boat Hull Maintenance Guide: Washing, Acid Cleaners, Gelcoat Repair, and Antifouling Paint
-
Service
Fixing Inflatable Boat Leaks and Replacing Worn Bimini Top Canvas
-
Owning
Buoy Mooring Setup, Dock Lines, Cleat Hitch Knots, and Anchor Pins
-
 Owning
Boat Trim Tabs Guide: Lenco, Zipwake, Bennett, and Electric vs Hydraulic
-
Owning
Upgrading Boat Swim Platforms, Boarding Ladders, and Marine Vinyl Seating
-
Owning
Best Gifts for Boaters, Practical Marine Accessories, and Kayak Storage Racks